How to Make Powerpoint Move on Its Own
Hands Create a Cocky-Running PowerPoint Slide Show
by Avantix Learning Team | Updated November 12, 2021
Applies to: Microsoft® PowerPoint® 2013, 2016, 2019 and 365 (Windows)
Yous can set upward self-running PowerPoint slide shows to run automatically at trade shows, conventions, events or as web-based presentations. Prior to setting upward a self-running presentation, you'll demand to apply your preferred animations to text and objects equally well as any slide transitions to exist be included in the show (unless specified otherwise in the Set Show dialog box). When y'all create automated slide shows, you also have the option of including specific slide timings, narrations or voice over and ink annotations.
Recommended article: How to Depict on PowerPoint Slides on the Fly During a Presentation (Using Ink)
Do yous want to learn more nearly PowerPoint? Bank check out our virtual classroom or in-person PowerPoint courses >
Setting up a cocky-running presentation
When you fix upwardly a self-running presentation, y'all can choose 3 options in the Ready Upward Show dialog box depending on your audience:
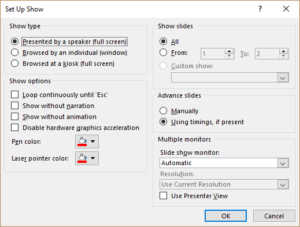
To fix up a PowerPoint presentation to run automatically, but allow those watching the slide show to have control over when they accelerate slides:
- Click the Slide Show tab in the Ribbon and then click Prepare Slide Evidence. A dialog box appears.
- Under Show blazon, select Presented past a speaker (full screen). This is the default setting for slide shows.
- Click OK.
To gear up a presentation to run automatically, but those watching the slide show practice NOT accept control over when slides advance:
- Click the Slide Show tab in the Ribbon and then click Set Slide Evidence. A dialog box appears.
- Under Show type, select Browsed past an individual (window).
- Click OK.
To gear up a presentation to run automatically, only those watching the slide evidence practice Non take command over when slides accelerate and the presentation repeats until the people watching press Escape (ESC):
- Click the Slide Show tab in the Ribbon and then click Prepare Up Slide Bear witness. A dialog box appears.
- Under Prove type, select Browsed at kiosk (total screen).
- Click OK.
Setting slide timings manually
You lot can choose to rehearse slide timings or you tin can manually set the slide timings for your PowerPoint slides using the Transitions tab in the Ribbon.
To set slide timings manually:
- Click the View tab in the Ribbon so click Slide Sorter.
- Select the slide for which you want to set timing.
- Click the Transitions tab in the Ribbon.
- In the Timing group, under Accelerate Slide, select the Later cheque box and then enter the number of seconds indicating how long the slide should announced on the screen. If you desire the next slide to appear either when you click the mouse or automatically after the number of seconds that you enter (whichever comes kickoff), select both the On Mouse Click and the Subsequently check boxes.
- Repeat the procedure for each slide for which you want to set timing.
Rehearsing and recording slide timings
If you choose Browsed by an individual (window) or Browsed at a kiosk (full screen) in the Ready Up Prove dialog box, you can rehearse and record timings for animations, transitions and advancing slides.
To rehearse timings, y'all'll use the Rehearsal toolbar shown below:
![]()
The toolbar includes the following buttons from left to correct:
- Next (advance to next slide)
- Break
- Slide time
- Echo
- Total presentation fourth dimension
Click the buttons in the Rehearsal toolbar to perform the following actions:
- Click Side by side to advance to the next slide.
- To temporarily finish recording the fourth dimension, click Break.
- To restart recording the time after pausing, click Suspension.
- To set up an exact length of time for a slide to appear, blazon the length of time in the Slide Time box.
- To restart recording the time for the current slide, click Repeat.
To rehearse timings:
- Click the Slide Show tab in the Ribbon and then click Rehearse Timings. The Rehearsal toolbar appears and the timer begins immediately. The presentation appears in full screen recording mode.
- Click the desired buttons. Click Next to advance to the next slide or press the right arrow on your keyboard. To temporarily stop recording the fourth dimension, click Pause. To restart recording the time after pausing, click Pause. To set an exact length of time for a slide to appear, type the length of fourth dimension in the Slide Time box. To restart recording the fourth dimension for the current slide, click Echo.
- Continue clicking on the appropriate buttons until you are satisfied with the timings. The total presentation time appears on the top correct of the Rehearsal toolbar.
- After y'all set the time for the concluding slide, a dialog box displays the total time for the presentation and another dialog box appears.
- To keep the recorded slide timings, click Yeah. To discard the recorded slide timings, click No.
The presentation appears. If you view the presentation in Slide Sorter View, the slide timing is displayed beneath each slide.
Recording a slide testify with timings
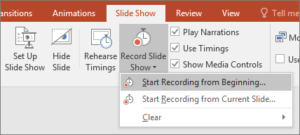
Instead of using the Rehearse Timings button, you lot can record timings (and narrations or voice over) as you record a bear witness. The Tape Slide Testify button appears on the Slide Show tab in the Ribbon. When you tape a slide show, you can start from the first or the current slide:
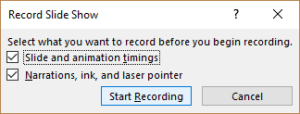
Later yous choose to record a slide testify, you will take the selection of including slide and animation timings also as narrations, ink, and light amplification by stimulated emission of radiation pointer (2010 users will not take the option of recording ink annotations):
If you select Slide and animation timings, PowerPoint automatically records the time y'all spend on each slide, including animations and triggers on each slide. If you have already apposite timings, they will be replaced.
If you utilize the pen, highlighter, eraser or laser pointer, those will also be recorded. Pen, highlighter, and eraser recording are available just if you have PowerPoint 2013 (and run updates) or a afterward version of PowerPoint. In earlier versions of PowerPoint, pen and highlighter strokes are saved as ink notation shapes. To learn more nearly including ink, check out the commodity How to Draw on PowerPoint Slides on the Fly During a Presentation (Using Ink).
To record a slide testify and include animations and timings:
- Click the Slide Prove tab in the Ribbon and then click the pointer beside Record Slide Evidence. A driblet-down bill of fare appears.
- Select Kickoff Recording from Beginning or Start Recording from Electric current Slide. A dialog box appears.
- Select the option to include slide and blitheness timings.
- Click Start Recording. The Rehearsal toolbar appears and the timer begins immediately. The presentation appears in total screen recording mode.
- If you lot desire to record timings, click the desired buttons. Click Next to advance to the next slide or printing the right pointer on your keyboard. To temporarily stop recording the time, click Pause. To restart recording the time after pausing, click Pause. To ready an exact length of time for a slide to appear, type the length of fourth dimension in the Slide Time box. To restart recording the fourth dimension for the current slide, click Echo.
- Go on clicking on the appropriate buttons until you lot are satisfied with the timings. The total presentation time appears on the elevation correct of the Rehearsal toolbar.
- After yous set the time for the concluding slide, a dialog box displays the total time for the presentation and some other dialog box appears.
- To keep the recorded slide timings, click Aye. To discard the recorded slide timings, click No.
- To finish your recording at whatever time, right-click on a slide and select End Show from the menu.
The presentation appears. In Slide Sorter view, the slide timing is displayed below each slide.
Recording narrations or voice over
In add-on to timings, you may desire to add together narrations or voice over. You can tape narrations before y'all run a presentation or you can record narrations during a presentation and include audience comments. When yous add narrations, PowerPoint automatically records your slide timings. Alternatively, yous tin gear up the slide timings first. Be certain to test the microphone start. If you do not want narrations throughout your unabridged presentation, you can record separate sounds or comments on selected slides or objects.
To record narrations, your calculator requires a sound menu, microphone, speakers and a webcam (optionally). You will too demand a microphone connector if the microphone is not part of your figurer.
It's not a bad idea to create a script first in Microsoft Word to improve flow and avoid filler words such equally "um". Y'all may besides want to exercise before recording although yous can always re-tape narration.
To tape a slide show with narrations:
- Click the Slide Bear witness tab in the Ribbon and so click the arrow beside Record Slide Evidence. A drop-downward bill of fare appears.
- Select Beginning Recording from Showtime or Starting time Recording from Electric current Slide. A dialog box appears.
- In the Tape Slide Show dialog box, select the check box for Narrations and laser pointer and, if required, select or deselect the Slide and animation timings bank check box.
- Click Starting time Recording. A Rehearsal toolbar appears.
- Speak into the microphone to record a narration.
- To pause the narration, in the Rehearsal toolbar, click Pause. To resume the narration, click Resume Recording.
- To end your slide show recording at any rime, right-click on the slide and then select Cease Testify.
The recorded slide show timings and narrations are saved. If you view the presentation in Slide Sorter view, timings announced beneath each slide. A sound icon as well appears in the lower-correct corner of each slide that has narration.
If yous re-record your narration (including audio, ink, and laser pointer), PowerPoint erases your previously recorded narration (including audio, ink, and laser arrow) when you start recording once again on the same slide.
To use ink, eraser, or the laser pointer during your recording, right-click on the slide, select Pointer options and cull the laser arrow, pen, highlighter or eraser. Ink is not available for 2010 users. If you want to display a light amplification by stimulated emission of radiation arrow while you're recording, press Command and your pointer will appear as a small red circumvolve on your screen.
Previewing narration
If you desire to heed to the narration on a slide:
- In Normal View, click the sound icon in the lower-right corner of the slide.
- Click Play.
Running a recorded slide show
To run a recorded slide bear witness in Normal View:
- If necessary, on the Slide Show tab in the Ribbon, click Set Up Slide Show. A dialog box appears.
- Under Show type, select the desired pick.
- Click OK.
- On the Slide Show tab, click From Get-go or From Current Slide. During playback, your animations, inking actions, light amplification by stimulated emission of radiation pointer, audio and video play in sync.
- To end the bear witness, printing Escape.
Turning timings or narrations off
You tin plough off timings and narrations and then turn them on again at any time.
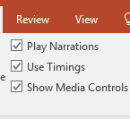
To plough off recorded slide timings, on the Slide Evidence tab, deselect the Use Timings bank check box.
To turn off recorded narrations, ink, and the laser pointer, on the Slide Show tab, deselect the Play Narrations check box.
Deleting timings or narration
You tin use the Clear command to permanently delete timings or narration from your slide evidence recording. Yous have 4 options:
- Delete timings on the current slide
- Delete timings on all slides
- Delete narration on the current slide
- Delete narration on all slides
To clear timings or narrations:
- On the Slide Show tab, click the arrow below Record Slide Show. A carte du jour appears.
- Select Clear then the appropriate clear option.
Once yous accept recorded a presentation, you tin later save it equally a video if you'd like.
Subscribe to get more articles like this one
Did you find this article helpful? If y'all would similar to receive new articles, join our e-mail list.
More resources
A Beginner'southward Guide to Video Formats in PowerPoint
How to Hide and Unhide Slides in PowerPoint (with Shortcuts)
How to Insert Video in PowerPoint (from a File on Your PC or a Shared Bulldoze)
PowerPoint Keyboard Shortcuts to Play and Command Video During a Slide Show
How to Add Animation in PowerPoint (Animate Images, Text and Other Objects)
Related courses
Microsoft PowerPoint: Intermediate / Advanced
Microsoft PowerPoint: Design for Non-Designers
Microsoft PowerPoint: Animations Bootcamp
Microsoft Excel: Intermediate / Advanced
VIEW More COURSES >
Our teacher-led courses are delivered in virtual classroom format or at our downtown Toronto location at 1 Yonge Street, Suite 1801 (Toronto Star Building), Toronto, Ontario, Canada (some in-person classroom courses may also be delivered at an alternate downtown Toronto location). Contact us at info@avantixlearning.ca if you'd like to arrange custom onsite preparation or an online course on a date that's convenient for you.
Copyright 2022 Avantix ® Learning
Microsoft, the Microsoft logo, Microsoft Part and related Microsoft applications and logos are registered trademarks of Microsoft Corporation in Canada, The states and other countries. All other trademarks are the property of the registered owners.
Avantix Learning | 1 Yonge Street, Suite 1801 (Toronto Star Building), Toronto, Ontario, Canada M5E 1W7 | info@avantixlearning.ca
DOWNLOAD HERE
How to Make Powerpoint Move on Its Own TUTORIAL
Posted by: lonniegoll1968.blogspot.com
How to Make Powerpoint Move on Its Own TUTORIAL. There are any How to Make Powerpoint Move on Its Own TUTORIAL in here.

